 |
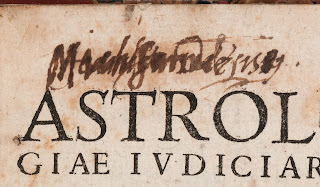
| Astrologiae iudiciariae ysagogica. Jean Taisnier, published Cologne, 1559 |
Months and months ago I showed these images to a group on a visit to see some John Dee books from the CILIP RBSCG annual conference. I promised to explain how I'd made them, and at long last, here's a how-to.
I started with a high-quality close-up photograph of the signatures, and I edited it using Photoshop Elements. Other photo-editing programmes are available (such as the free GNU Image Manipulation Programme) and would work just as well. The functions will probably look a bit different, though.
The first step is to create a new layer. Layers are like old-fashioned sheets of acetate that you can pile up on top of each other. You can edit what’s on each layer individually, and can set the transparency (and other attributes) of each layer. Create your new layer via the layer menu.
Next, I painted the new layer white using the bucket tool.
Then I set transparency of the new layer to around 40%. You can switch which layers you can see by clicking the little eye icon next to the layer name.
To reveal one of the signatures, I used the eraser tool to remove areas of the white layer, to reveal the full-colour ink beneath. There was no magic involved – just a lot of careful editing, using the book itself as a reference. You can change the size and shape of the eraser tool using the controls at the top of the window. If you erase too much then you can add it back using the brush.
I used exactly the same procedure to uncover the Saunder signature. It took ages, with plenty of switching between the two to check that all the bits of ink were accounted for.
When I was happy with the images, I saved each as a separate jpg file, and saved the Photoshop file so that I could come back later and tinker with the images further.
I’d hoped to use this image in the exhibition proper, and to display it next to the book itself. The image didn’t make the final cut, but we’ve been using a gif (animated image) of the two different signatures fading in and out as part of the exhibition publicity. Watch this space for a post about how I made the gif itself.


0 comments:
Post a Comment